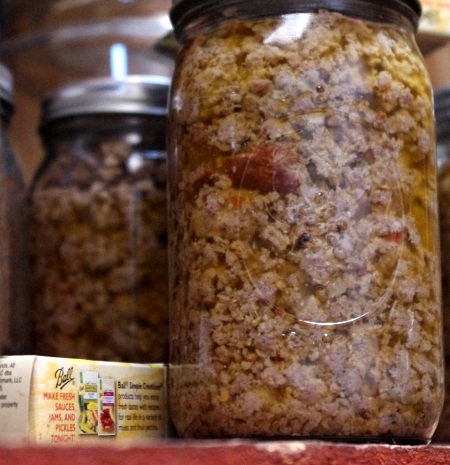
What do you do when a neighbor puts lots of homegrown pork plus lard on the community market? If you’re us you say “We’ll take whatever you’ve got after everyone else gets what they want.” So naturally 90 pounds of ground sausage and pork become yours.
So right now we’re putting up pork. We do have a small solar freezer, but because of our slowly-falling-apart battery array we decided to go ahead and can it.
At some point we’d like to be able to salt, smoke, brine, lard, or dry our meat in order to preserve it in a more sustainable manner, but one year into this little homesteading gig we aren’t anywhere near that set up yet. Canning is a great means to preserve meat until we get to that point.
And how can you say no to meat that came from a pig you see every time you head to town – happily rolling in the mud, with plenty of access to good food, water, and sunshine? We couldn’t.
I recommend following an expert listing of exactly how to can meat like this one from the USDA. While I am thankful to be able to can all of this wonderful meat, and so far every canning session I’ve done has resulted in safe food, I am in no way an expert.
Our basic canning process goes like this:
Wash/sterilize jars. How you do this is up to you. Some boil them, some soak them in bleach water, and some just wash them in hot, soapy water.
Prepare meat. I have done turkey in which I cut the meat off the bone, stuff it into a jar, and reserve the carcass for stock. I have done beef and pork where you cut them into stew meat chunks and pack them in the jar. We are doing ground pork and ground pork sausage and for that we are browning the meat first.
Pack jars and seal. I use a canning funnel and spoon the meat, and in the case of the sausage; the drippings, into the jar and pack it in tight. Because we use mostly wide-mouthed jars I am able to remove the funnel and make a fist with my clean hand and press the meat down that way. The cooked sausage behaves differently, so I just use a wooden spoon. Once packed to a bit below the rim, I remove the funnel, wipe the glass rim with hot, soapy water to remove any greasy residue that might prevent a good seal from forming. Then I place a new lid on top followed by a clean canning ring. A great tip I received from a neighbor much more experienced at meat-canning than I was to screw the canning ring on with your fingertips until fingertip-tight.
Process. You can get seven quarts into the pressure canner we are using, so we put them in to a canner that has a few inches of water in the bottom. (Note: the water does not need to go above the level of the jars as in a water batch canner.) Place the lid securely on the canner and then put it over a high burner. Once the water is boiling the top with have to “steam out”. This is simply waiting for a stream of vigorous steam to begin escaping the small pipe where you will be placing your weighted gauge. Allow that to steam out for ten minutes. Place the weighted gauge on the steam valve, and let it build pressure.We process our meat at 15 lbs pressure for 90 minutes. Then turn off the burner and allow the pressure gauge to reach back down to zero. You can now remove weighted gauge, lid, and jars. Allow jars to seal and sit a while before moving.
And then you have a perfectly delicious jar of meat waiting to be used in anything from pot pie to spaghetti sauce to stew. It is a homesteader’s convenience food.


