How would you like to enhance the quality of your meals? How about with better flavors and better nutrition? What about fresh access right outside your back door?
Gardening to supply your own produce offers the potential to create meals in which you know exactly what inputs are being used, ensuring you have control over the quality of the food you consume. By taking the reins for the entire process from seed to table, you can feel confident that your food is free from the plethora of additives, synthetic fertilizers, pesticides, and chemical cleansing used in the typical agricultural systems that supply food to your everyday grocery store. Even certified “Organic” produce pales in comparison to the purity and nutrition that can be easily realized through a bit of home gardening know-how.
Although the benefits are many, one of the difficulties in producing your own fruits and vegetables is timing. More often than not, we gardeners find ourselves yearning for those first few fresh picks in mid spring only to be overwhelmed by more produce than we know what to do with just a few months later. This common scheduling dilemma creates difficulties when you’re trying to prepare consistent meals on a week to week basis, but we’re here to help!
Keep a few of the following expert garden planning tips up your sleeve, and you’ll be smoothing out that harvest window to create a longer season of diverse and delicious fruits and vegetables. Say hello to food security and goodbye to reliance on corporate agriculture!

Crop Protection
The first strategy we should look at is how to extend the growing season itself. Your harvest window can be lengthened in a number of ways, and implementing two or more of the following methods together can guide you towards a wider period of food supply. I’ll mention crop protection first because it can require a little bit of material parts and setup. When we talk about “crop protection,” what we’re referring to is simply utilizing some sort of material to cover to protect your plants from pressures such as frost, hail, pests, wind, and even intense sun. I want to make a special mention of frost in particular though because if you aren’t lucky enough to live in the tropics, you inevitably lose out on the grand total of hospitable growing days for crops that are sensitive to freezing temperatures. Greenhouses are a prime example of crop protection because they create the “greenhouse effect” (remember 6th grade?), which warms the air and soil underneath, thereby replicating the effect of being somewhere closer to the equator than you actually are. It helps to make your last spring frost arrive earlier and your first autumn frost later.
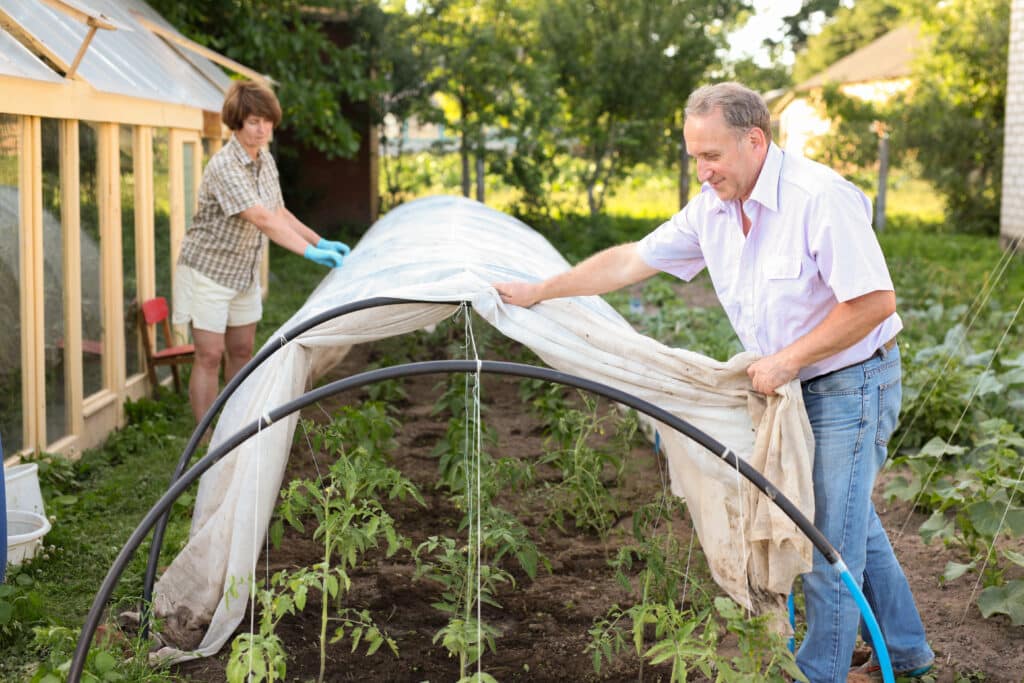
The cost of a greenhouse can be quite high, but luckily for the home gardener, numerous alternate options can be much more fiscally accessible and easier to set up. If you look up “remay,” “frost cover,” or “floating row cover” online, you’ll see options for a light fabric that can be pulled over your crop rows like a long skinny blanket. It’s fairly cheap, and nurseries often sell it by the foot. It’s offered in a scale of various thicknesses. The thicker the remay, the better it protects against frost, but it will help to have supporting hoops made to keep the weight of the cover from having to be held up directly by your plants. You can order hoops meant specifically for this job, or my favorite homemade design is to use ½” PVC pipes (6 – 8 ft. long) slipped onto ½” wide rebar lengths (2 ft. long). For the finishing touch, you’ll just want to weigh down the edges of the cloth with small bags of dirt (or whatever you can find that weighs roughly 5-10 pounds and won’t rip the fabric.
Scale this concept upward, and you can build what is called a “hoop house” or “high tunnel,” where you are simply taking the same idea and making it larger (think 6-10 ft. ceilings). With larger structures, it’s a better strategy to use plastic greenhouse sheeting rather than fabric remay so that it can be a little more permanent. Take a quick look online for numerous DIY options. A combination of these strategies can allow you to grow a number of crops all the way through winter even in the coldest of climates!
Crop Selection
Now let’s think about crop selection. If you want something to harvest in early spring, the best plants to choose from are going to be the ones that have shorter “days to maturity” as well as a tolerance to lower temperatures. Greens are a fantastic go-to here. Spinach, arugula, swiss chard or beet greens are quite tolerant of low temperatures, as is kale, but even most lettuce can take a light frost. And you can harvest all of the above as “baby greens,” meaning you don’t even have to wait until they’re large or mature. Radishes, carrots, beets, and peas can all be seeded directly into fairly cold soil in the early spring and provide a more weighty and substantial spread of produce just shortly after you’ve begun harvesting greens.
I am also a huge advocate of perennials, which require less work since they come back year after year on their own, and this also means they can be some of the first providers of the season. Asparagus, followed closely by strawberries, are my favorite go-to perennials for some of the earliest harvesting you could ask for. Swiss chard deserves a second mention here too because it is actually a biennial (two year lifecycle), providing some of the earliest greens around at the beginning of its second year.
Other frost tolerant plants such as cabbage, broccoli, and cauliflower can be planted in the ground in early spring as well. They may take slightly longer to mature than salad greens, but a good head start will make all the difference. The earlier you start your first round of any particular crop, the earlier it can be harvested, and the earlier you can plant something else in its place. This brings us to another important tip for continual food abundance – rotations.

Crop Rotation
Simple in concept but frequently overlooked by even experienced gardeners, crop rotation (in this context) refers to using the same garden beds for multiple plantings throughout the season. Get a head start with some of the early plants mentioned above, and you can pull off planting long-season crops like tomatoes, peppers, or squash right where you already pulled out a round of radishes or spinach, etc. Especially when combined with the aforementioned season extension strategies, the possibility of yielding 2-3 crops from the same bed within a single season can be realized even in cold climates. Simply pay attention to how many days each crop requires to maturity (info that’s included on most seed packets or easily found online), and add the number of days together to get your total time required.
Succession Planting
Closely related to crop rotation is succession planting, which means planting smaller numbers of individual plants per crop every 1-3 weeks rather than many at once. It helps to have a calendar to keep organized about it, but with short-season crops like all of the early starters mentioned above, it becomes highly beneficial to supply your kitchen with small harvests every 1-3 weeks rather than having to find ways to preserve or waste the excess created by planting too much at once. This concept also helps spread out labor, which makes gardening easier overall, and it also makes a lot of sense for crops that don’t keep for long in the field as the days get hotter (e.g.g. salad greens, spinach, cilantro, basil, etc.). You can even plant some of these short season crops much closer in proximity to long-season crops that grow much larger. The short-season crops can be harvested as soon as the space gets crowded with larger, long-season crops like tomatoes or squash.
All of the above concepts are really quite simple to implement, and now that you have the knowledge, you have the power! Diversifying your garden to include short-season crops that thrive at the beginning and end of the season, coupled with the use of an aforementioned crop protection/season extension strategy, allows you to yield consistently throughout the year with a garden that caters much more efficiently to your kitchen. Planning meals becomes infinitely easier with the right tools. Use crop protection, selection, rotation, and succession plantings to provide a continually fresh supply of fruits and vegetables, and let Plan to Eat assist you with week after week of consistent and functional meal planning!
This guest post is authored by Cody Hitchcock. Cody is a horticulturist by profession as well as an urban agriculture enthusiast invested in outreach and education to improve human and environmental health.
If you would like to connect with Cody, contact [email protected] for outreach and partnership opportunities.


